Tutorials
Im not very good at these tutorial things!!
Just before I get to work..I hope this helps anyone wanting to do the lace bat project...any questions feel free to ask. I used matte photo paper 220gsm, I printed them in different sizes, cut them out put a hole at the base of the body and added a little faux leather as the legs and a bulldog clip to hang them.


I printed off pictures of Victorian tiles using matt photo paper.
I just measured the tiles and recreated the same size print.
I painted over my exsisting tiles with matt emulsion (latex paint)
I cut out the tiles and P.V.Ad them (white school glue).
Once I had gently flattened them I left them to dry.
I went over the tiles with a water based varnish (about 3 times).

The wall panelling begins....


I originally wanted to make some christmas tree bunting..
Just before I get to work..I hope this helps anyone wanting to do the lace bat project...any questions feel free to ask. I used matte photo paper 220gsm, I printed them in different sizes, cut them out put a hole at the base of the body and added a little faux leather as the legs and a bulldog clip to hang them.


I printed off pictures of Victorian tiles using matt photo paper.
I just measured the tiles and recreated the same size print.
I painted over my exsisting tiles with matt emulsion (latex paint)
I cut out the tiles and P.V.Ad them (white school glue).
Once I had gently flattened them I left them to dry.
I went over the tiles with a water based varnish (about 3 times).

The wall panelling begins....


Handmade Architrave and Pediment


I originally wanted to make some christmas tree bunting..
After making it I decided on not having a tree this year!
It went on the ceiling!
I had so much fun making it though...
First Gather your supplies...
some string, wool ....
Glue gun..I used around 2 glue sticks...
Paper, felt, fabric, whatever...

cut out a diamond template to use on your medium....
so you can just fold over and glue..


I felt like taking it really easy today...
What better than a wee browse around the local haberdashery shop..
Needle point in Selkirk..
I picked up some nice silky smooth wool...
What better for a Tassel tutorial..

You will need wool...
scissors,
crochet hook,
1 sheet card stock quartered (5 inch tassels)
and some bronze accessories.

Place two of the quartered card stock sheets together..
Wrap the wool around them about 80 times or whatever...
place the scissors in between the two bits of card and cut..

Put the wool through the D-ring...
Alternatively you could use a bit of wool here and just tie a knot...

Tie a knot an inch down..
Use the crochet hook in the tied knot to pull through the extra wool...


Lampshade Revamp

Heres how I done it...
Turn the shade on its side and roll and cut...

Glue with Pva and clamp on..

one dry give it a trim...

I added some feathers and gave it a lick of chalk paint...

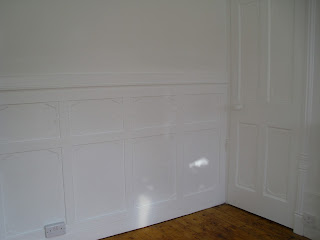
Wall Panel Tutorial
Wall panel Tutorial for the wall behind my new revamped Buffet Sideboard.
Finished (still have a few things to put on the wall)

I bought some redwood planed timber standard 16 x 75mm...
Thats roughly 3 Inches wide x 0.5 Thick.
I bought 6 pieces and it cost £27.00 , I only needed 3 pieces.

All you need is a saw, measuring tape, panel pins and some PVA (optional).
I drew on the wall directly where I wanted the batons to go.
Not a very good pic lol..

It took me around 40 minutes..
To measure, saw and pin the batons.
so quick and easy because I had drawn up the design before hand.

Next you need decorators caulk, oil based paint, emulsion and satinwood to finish.
I fill in all the gaps and go around every join with the decorators caulk.
I leave that to dry overnight .
I go over all the panel pins with an oil based paint to stop them from rusting.
I emulsion twice and satinwood twice and heres the finish. :)

This has been one of those many projects Ive been meaning to do...
you know the ones???
Heres how it came about...
I bought a new oil filled radiator online..
it was delivered in a nice big cardboard box ...
a box perfect for my project..
A cereal box just wouldnt have been the right size!
A 3D Letter S..
24" x 15"

I started off drawing the letter S freehand on a big piece of paper.
I really wish I had taken longer to research S fonts..
Im always the same i rush into every project!

I traced the letter onto the cardboard...
cut out two pieces for the back and front.
I rolled and taped 2" pieces of card and glued them to the base.
2" is the thickness of the Letter.

Covered the top piece in glue and stuck it on.
I left it to dry overnight.
I forgot to take a pic on how to do the sides..
It really is the easiest part..
Cut 2 inch strips and just tape them to the top and the bottom.

DO NOT DO THIS ...
I decided to cover it in plaster of paris...
It softened the cardboard and ended up in an absoloute mess...
I had to strip the lot back to above photo and start again!

A wee close up

Plant Pot Covers
I printed some patterned paper.
I rolled the bucket like I would a lampshade,
marking a line from start to finish.
Glued the paper on and varnished it.
Tip: spray varnish is better as the brush smears the ink.


Enjoying your tutorials... I think you're very good at describing what you've done and how. More please... a blog about how you choose your patterns and how you put them together, is it color or the design based? Or a blog about creating balance, you have a great eye for scale and just the right texture... I just want to get inside your head and see what you see... oh, and thank you for all you do! Exploring your site has been a real pleasure.
ReplyDeleteaww thank you so much Nina...Im not a great writer or very good at explaining my process..I just do it lol....a lot of mistakes before I get a result and sometimes I just get a result lol!!
ReplyDelete